Cigars
“Cigars” are a broad category of smokable tobacco items that can be loosely defined as “tobacco wrapped in tobacco”. This includes the use of reconstituted tobacco sheet (paper made of tobacco) as a wrapper, or as a binder beneath a natural leaf wrapper. Cigars range from tiny cigarette-sized ones with filters, to chair-rung size, Caribbean-style premium cigars made of full-length filler leaf bound in natural leaf, and wrapped in natural leaf. This discussion relates exclusively to tobacco (either long filler or scrap) wrapped (and usually bound) in a natural leaf. A perfectly smokable and delicious cigar can be rolled from well-aged, whole leaf tobacco of just about any variety. The wrapper does need to be mostly free of holes, but otherwise, can be from any class of leaf. That is to say, that a stack of leaf from a variety considered to be “cigar filler” may provide some nice wrappers-if you just look through the leaves carefully. Experimentation is what makes rolling your own cigars such a pleasure. Learning to roll a cigar is a relatively easy skill to acquire. It usually takes a complete novice about 10 cigars (rolled and smoked one at a time, not made in a batch) to begin to consistently roll a cigar with proper draw. Rolling a nice looking cigar may, of course take longer. But the skill will come naturally with time. [Keep in mind that a novice cigar roller at a cigar factory will roll 100 or more cigars per day. So your first 100 cigars could be considered only 1 day of practice.] An ugly cigar that offers a good draw, and burns properly is a far better result that a work of art that is too loosely or too tightly rolled. Free-hand rolling, without using a cigar mold, is easier for a novice to accomplish in a way that draws properly, than by using a mold. Learn how to roll, then consider improving the appearance with a mold, if you desire. In the same vein, rolling a cigar that smokes well does not require a chaveta or tuck cutter, or even glue or a rolling board. So long as you have a decent, straight-cut cigar cutter (clipper)–and decent leaf, you can roll a smokable cigar The only important secret is to bring the leaf into proper case (moisture content). You can just hand-tear the stemmed filler to a suitable cigar length, and wrap it in a half-leaf on any surface. It may not be pretty, but with practice, it will draw well and will smoke well. And you will be gratified at having rolled it yourself. Once you have a feel for rolling a cigar by hand-one that draws well, then adding the tools of the trade can allow you to create perfectly artistic cigars-give one to your father-in-law quality-as well as duplicate an exact length and ring gauge. The tools and their use will be discussed in the sections that follow.
Cigar Tools
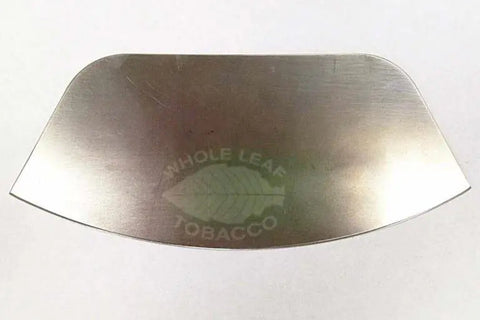
A chaveta is a flat, steel blade with a curved cutting edge (usually 6 to 8 inches long), but no handle. The chaveta is held by its flat, upper edge, and rocked over the surface to be cut. It is used to trim the outer edge of a wrapper for wrapping a cigar, and is also used to shape to wrapper to the size and contour of the filler bunch.
While any knife (or even scissors) can perform the same function, using a chaveta or similarly curved blade that can be rocked makes the required cuts more effortlessly and more precisely.
Chavetas are not mass produced for the commercial supply chain. They are niche blades that are usually custom made by small craftsmen. (In 3rd world countries, they are often made from the worn-out blades of circular saws.) Those made of carbon steel are far easier to sharpen, but will dull more rapidly from use, and will rust, without taking precautions to prevent it. Stainless steel chavetas will never rust, and will require sharpening less frequently, but are more difficult to sharpen, because of the hardness of the steel.
Any type of cutting board of adequate size (14″ x 11″ is large enough to roll a very large cigar) can be used for rolling cigars. While some rollers like to use a stone cutting board, because a moist wrapper can be spread on it more easily, the stone surface will rapidly dull a chaveta. Wood cutting boards are what the cigar factories regularly use. An inexpensive, relatively thin, bamboo cutting board will last for many years of cigar making.
A kitchen cutting board that is concurrently used for food is a poor choice, since the tobacco will pick up food flavors, and food will acquire tobacco dust. A dedicated cutting board, used only for cigar rolling is ideal. After each rolling session, just brush the surface with your hand or a paper towel over the trash can, to clean away the tobacco bits and dust that may have accumulated.
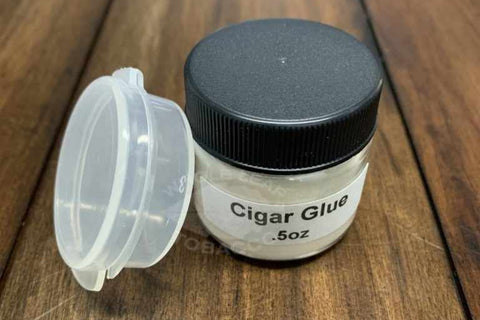
Cigar glue is used to prevent the wrapper from coming off the head of the cigar after it is opened (clipped). If you roll one cigar, and immediately smoke it, then moisture from your mouth will prevent unwrapping. If you instead roll multiple cigars at a time or intend to “rest” the cigar for a time in a humidor, then using glue will allow the cigar(s) to behave like a factory cigar-and not unwrap itself, even though fairly dry.
Any natural glue can be used. Each of these is a complex carbohydrate that becomes sticky when moistened and holds two surfaces together when dried. These include most natural, non-latex gums, such as gum acacia, gum Arabic, tragacanth, xanthan gum, and even pectin. Bermacol is most commonly used in cigar factories. The various gums are used as thickeners in many foods, from commercial salad dressings to chocolate milk to canned chili.
Every gum has a taste. Most cigar smokers can taste only some of the gums, while other cigar smokers can taste others. If you use a cigar glue that has a noticeable taste, just switch to another one.
Most of these gums come as a powder that must be hydrated for use. Since only a minuscule amount is used on each cigar, mix only a tiny batch at a time. Add the powder to a very small container (like the size of a custard dish or smaller), then add a couple of drops of water at a time, mixing it to achieve the particle-free consistency of a thick, smearable paste. If any of the prepared gum is left over after you have finished using it for the time being, cover it with plastic wrap, and refrigerate it. If the prepared gum dries out between uses, you can try adding a few drops of water to reconstitute it. (Some, such as xanthan gum, may require rehydration with warm water.)
Cigar glue is used only at the head end of the cigar binder or wrapper, extending no more than an inch along the outer edge. If you are adding a cap to the cigar, then glue is used as needed to attach it. In applying the glue, wrap the cigar-starting at the foot, wrapping toward the head-to near completion, then use the tip of a finger to very thinly smear a tiny amount of glue to the outer edge, prior to completing the wrap. There should not be enough glue to squish out and be visible. Use of too much glue may allow the wrapper to unwrap before the glue dries sufficiently.
Properly mixing and applying cigar glue requires a little practice. But only a little.
A cigar mold has two major purposes. The first is to allow any cigar roller to produce a cigar of a very specific size and shape-important for a cigar factory, which will need to pack the cigars produced by different rollers into the same box. The other is to produce many identical cigars at one time-also important to a factory, which offers only a limited selection of possible sizes and shapes.
For the home roller, the only real advantage is that a mold makes it easier to wrap a perfectly smooth cigar, if that is an important consideration. For the complete novice, a mold encourages rolling many bad cigars at once, and is probably not a good idea. Once the basic skill has been learned of consistently rolling a cigar that draws well, then using a mold can improve their appearance. But rolling a cigar bunch for placing into a mold is a separate skill that will need to be learned.
The lid of a cigar mold is different from the bottom of the mold. The bottom is crafted with deep wells into which cigars can be placed, while the lid indentations for cigars are much shallower. Cigar molds are commonly made for 1, 2, 10 and up to 20 cigars, and come in figurado (curved shaped) as well as parejo (parallel or cylindrical) forms. Another consideration is the ring gauge of the mold. If you prefer a cigar of a particular thickness, then select that ring gauge mold. The wells of parejo molds are usually fully open at the foot end, allowing them to be used for any length cigar of a specified ring gauge.
Using a mold is fairly simple. A properly sized bunch of filler is wrapped in a binder, and glue applied at the head. Usually, the binder is left with its twisted pigtail at the head. The bound bunch is then placed into the mold so that its head is toward the closed end of the bottom mold well, with its pigtail extending through the narrow slot at that end. The fit should be snug, but not truly tight. Once all of the cigars intended for the mold have been placed into their bottom mold wells, the mold lid is placed on top of it, and either clamped or weighted, so that it completely mates with the bottom.
A mold tends to leave a linear crease in the binder on either side of the cigar, where the mold top and bottom meet. To minimize this, the mold is opened after at least 15 minutes, and each bunch is carefully lifted out, rotated 90 degrees, and returned to its mold well. The lid is again placed on top, and clamped or weighted for the remainder of the pressing time-30 minutes or even overnight.
With a wooden cigar mold, excess moisture in the cigar bunch(s) is slowly drawn out. This does not happen with a plastic mold. But a plastic mold will have a longer service life. Cigar molds are available for a vast number of different cigar sizes and shapes.
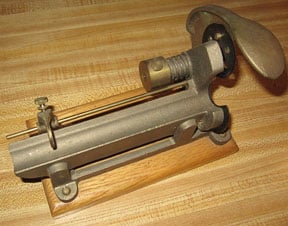
The “tuck” of a cigar is the same as the “foot” of a cigar-the end at which wrapping begins, and the same end that the smoker will eventually light. The term, “tuck”, comes from the process of tucking the starting tip of the wrapper, as you begin to wrap the bunch. The purpose of a tuck cutter is to cut the foot of a cigar to a specified length, which is set as a set-screw stop along the tuck cutter’s length. When mass producing identical length cigars, a tuck cutter saves the time required to precisely measure the desired length on each new cigar.
For a home-roller, the primary use of the tuck cutter is simply to obtain a clean, 90 degree cut at the foot. In the absence of a requirement to produce multiple, identical length cigars, any flat blade cigar clipper can perform that job just as well, and for only a fraction of the cost of a tuck cutter. Whether or not a tuck cutter is attached to the cutting board, or rests on its own stand, a tuck cutter occupies more space in your rolling area, whereas a simple cigar clipper is a tiny, mobile thing.
Tuck cutters are available with differing blade types. Some have a simple guillotine blade, some a blade that can be progressively rotated to a fresh edge, and some with a choice of cutting arcs for differing ring gauge cigars. On some, the cutting edges are easily replaceable (if you can locate the parts), while others must use the same blade for the life of the tuck cutter.
To create a cigar with a rectangular or square cross-section (sometimes called box-pressed or square-pressed), a bound bunch-filler bound in just the binder, still round, is fitted into a wooden mold that squares the sides. After pressing to the desired degree of angularity, the bunch is removed, wrapped in its wrapper, then very gently repressed for rounded corners, or firmly repressed for sharp corners.
To create a cigar with a rectangular or square cross-section (sometimes called box-pressed or square-pressed), a bound bunch-filler bound in just the binder, still round, is fitted into a wooden mold that squares the sides. After pressing to the desired degree of angularity, the bunch is removed, wrapped in its wrapper, then very gently repressed for rounded corners, or firmly repressed for sharp corners.
Kinds of Cigars
For well over a century and a half, the majority of cigar smokers in the US smoked what may be considered American-style cigars. Originally all hand-rolled, by the early 20th century, most of these cigars were being machine-bunched as well as machine-wrapped, which kept their retail prices below about 10 cents per stick. Their fillers used American variety tobaccos, such as Pennsylvania Red, Little Dutch, Lancanster Seedleaf, Glessnor, Swarr, Maryland and even burley varieties. The binders tended to be American binder-class tobaccos, such as Wisconsin Seedleaf, Comstock Spanish, Pennsylvania Broadleaf and Connecticut Broadleaf.
American preferences for wrappers were focused on light-tan claro leaf, with thin, Indonesian Sumatra wrappers taking the lead in the late 19th century, soon replaced by the newly developed Connecticut Shade Grown. There were also Florida Sumatra, Dixie Shade and several others. Dark wrappers were nearly all Connecticut Broadleaf or Pennsylvania Broadleaf. Following World War II, the popularity of green wrappers, called candela, increased (presenting the image of a “cleaner” cigar habit), and displaced nearly all natural wrappers for about a decade in the 1950s. [Candela wrappers are flash-cured while still green, retaining the leaf’s chlorophyll, and completely lacking in any natural cigar flavors.]
Most American-style cigars are delicious and enjoyable, but fundamentally different in taste and aroma from cigars made with predominantly Central American and Caribbean varieties of leaf. The introduction of Honduran and Nicaraguan cigars in the late 1960s and early 1970s began to make inroads into the popularity of American-style cigars (in the US), but only among a niche clientele. They did, however, eliminate the popularity of candela-wrapped cigars. “Natural” and soon, “Cameroon” wrappers became the favored wrapper on American-made cigars. [Cameroon wrappers are a variety of Indonesian Sumatra Deli leaf grown in the African country of Cameroon.]
The so-called cigar boom of the late 1990s-with its celebrity-endorsed reviews and numerical cigar ratings, spelled doom for the American-style cigar, and eventually, by about 2017, for the entire cigar manufacturing industry in the US, which has nearly ceased to exist, with the exception of the mega companies owned by Swedish Match and other multi-national corporations, Some are still smokable, but most of the sales go to flavored and scented cigars.
Since the late 19th and early 20th centuries, cigars from Havana, Cuba have been blessed with an aura of being the best cigars in the world. This is despite the fact that, until the early 1920s, tobacco grown in Cuba was a collection of random, poorly selected, varietal cultivars. Seedling suppliers there were careless and haphazard in what they produced and distributed, and growers planted whatever they received, performing “selection” of leaf on the maturing plants, and sorting the resulting leaf for various, different uses. But the combination of soil and climate in Cuba, especially in the Vuelta Abajo, is ideal for the production of cigar tobacco, and the majority of what was grown was loosely derived from prototypical Habano-type tobacco, later named the Vuelta Abajo variety. Most subsequently developed strains, Corojo, Criollo, Criollo 98, etc. were derived from the Vuelta Abajo variety.
Much of the credit for transforming that production into world famous cigars was due to the talents of the cigar blenders and the skilled rollers (torcedores) of Havana’s cigar factories. They performed the most polished blending and the most consistently beautiful and smokable cigars available anywhere.
With the US embargo of Cuba-extended to cover everything, by John Kennedy in 1962, as well as the nationalization (appropriation) of the Havana cigar factories by Fidel Castro’s government, many of Havana’s finest cigar experts migrated to Florida, Mexico, Honduras, Nicaragua and other countries, taking their talents and knowledge with them. While premium cigar manufacturing has since languished in Tampa, Florida and Miami, the “Cuban” cigar industry as gained a second life in Central and South America.
All the output of these reborn “Cuban” cigar manufacturers in countries outside of Cuba has focused throughout their existence on producing Cuban-style cigars. A similar style of cigar has been made in the Dominican Republic, and for a while, in Puerto Rico and even the Canary Islands. All of these-true Cuban cigars, Central and South American cigars, as well as those made on various other islands of the Caribbean, can now be globally considered as cigars of the Caribbean Basin, or Caribbean-style cigars.
Their general characteristics are darker wrappers, relatively stronger fillers-most from Habano or Habano-derived tobacco varieties-having a broad, somewhat rounded leaf, and a highly polished appearance. While the possible combinations of components and size and cross-section are infinite, they all unmistakably resemble one another.
Although Caribbean-style cigars are popular throughout Europe, traditional European-style cigars remain. These are typically small cigars-cigarillos-that are intentionally manufactured to be stored and smoked dry. They are usually not intended to be stored in a humidor. These cigarillos often came in small tins of 10 cigars, and are machine-made.
Methods of Rolling
For the complete novice, it is worth understanding that a long-filler cigar is not made by twisting the tobacco. A better image is that of a bundle of sticks wrapped from top to bottom with a ribbon. The process of gathering the filler leaf into a bundle is called bunching, which can be approached using one of several different methods, discussed below. The bunched filler is compressed together by wrapping it with a sturdy strip of leaf, known as a binder. Sometimes, this bound bunch is set into a cigar mold, in order to make its surface smoother, and perhaps to shape it further. The bound bunch is then wrapped again with a second strip of leaf, known as a wrapper, selected usually for its appearance.1) Simple bunching
Simple bunching is fast and effective, after a little practice. Grab some leaf, and squeeze it into a cylindrical form with your hands. Excess length can be torn off, and added to the thickness of the bunch. The objective is to avoid any knots or clumps of tobacco that may obstruct air flow within the filler bunch, to avoid multiple layers of nested leaf, and perhaps to distribute different components of the blend in a particular arrangement within the bunch. If flat leaves are simply placed on top of each other, then rolled up like a beach towel, the flow of air and combustion will channel only through the center of the cigar, leaving the exterior unburned. The leaf within the bunch should be equally crinkled and equally compressed.
2) Accordion bunching (sometimes called booking)
Accordion bunching is relatively fast, but requires quite a bit of practice to perform consistently. With this method, individual-or even stacks of individual-leaves are tightly folded back and forth, like an accordion. Many cigar factories use this method. Compared to other methods, the final compression of the bunch is not as uniform, and sometimes leads to an inconsistent draw. Placing accordion-bunched cigars into a cigar mold may minimize the asymmetry that it sometimes produces in the cross-section of the bound bunch.
3) Entubado (tubed) bunching
Tubed bunching is the most tedious and time consuming approach to bunching, though it may theoretically provide the most consistent draw in the finished cigar. Using this method, each segment of leaf within the bunch is tightly rolled into a “tube”. The tubes are then assembled into a complete bunch of many tubes. This is then bound. Some rollers cut the leaf segments prior to rolling the tubes, then carefully roll an actual tube. Another approach is to start at the leaf base end of a frog-legged filler leaf, and loosely roll it onto itself in a helical form, along an axis parallel to its secondary veins, so that once the top of it is grasped, it remains wound. Each of these helical tubes is added to the accumulating bunch. When using uncut filler leaf, excess length can be torn off, and added to the thickness of the bunch.
While the tightly rolled, carefully cut tubes present a striking visual pattern at the open foot of a finished cigar, and certainly permits adequate draw (if not too tightly compressed), the air flow improvement rationale of this method may exist only in theory, and depend mostly on degree of compression of the bunch. Entubado filler is no doubt more effective at providing adequate draw compared to accordio-pleated filler.
4) Long-scrap and short-filler cigars
Long scrap can usually be bunched using simple bunching, and bound in the same fashion as a long-filler cigar. Short scrap or even shred is more troublesome, in the absence of a specialized bunching device, such as a Lieberman. A Lieberman is a lever-arm rolling mat that traps a pocket of short filler, much like a manual cigarette roller, and compresses it into a cylindrical form, while allowing a binder to be inserted and wrapped about the filler. There are little, hand-held cigarillo rollers on the market that are just enlarged versions of a manual cigarette roller.
American preferences for wrappers were focused on light-tan claro leaf, with thin, Indonesian Sumatra wrappers taking the lead in the late 19th century, soon replaced by the newly developed Connecticut Shade Grown. There were also Florida Sumatra, Dixie Shade and several others. Dark wrappers were nearly all Connecticut Broadleaf or Pennsylvania Broadleaf. Following World War II, the popularity of green wrappers, called candela, increased (presenting the image of a “cleaner” cigar habit), and displaced nearly all natural wrappers for about a decade in the 1950s. [Candela wrappers are flash-cured while still green, retaining the leaf’s chlorophyll, and completely lacking in any natural cigar flavors.]
Most American-style cigars are delicious and enjoyable, but fundamentally different in taste and aroma from cigars made with predominantly Central American and Caribbean varieties of leaf. The introduction of Honduran and Nicaraguan cigars in the late 1960s and early 1970s began to make inroads into the popularity of American-style cigars (in the US), but only among a niche clientele. They did, however, eliminate the popularity of candela-wrapped cigars. “Natural” and soon, “Cameroon” wrappers became the favored wrapper on American-made cigars. [Cameroon wrappers are a variety of Indonesian Sumatra Deli leaf grown in the African country of Cameroon.]
The so-called cigar boom of the late 1990s-with its celebrity-endorsed reviews and numerical cigar ratings, spelled doom for the American-style cigar, and eventually, by about 2017, for the entire cigar manufacturing industry in the US, which has nearly ceased to exist, with the exception of the mega companies owned by Swedish Match and other multi-national corporations, Some are still smokable, but most of the sales go to flavored and scented cigars.
---
It is possible to lay an ordinary binder strip on the rolling board, then add little piles of short filler, as the binder is slowly wrapped, inch by inch. A more effective hand-binding approach is to use a broad binder leaf that is cut to its full width, parallel to a secondary vein, so that there is a cigar-length straight edge at the start of rolling. Two or more smaller such binder strips can be combined to comprise the full length of the cigar at the start of rolling.
Bunching short filler in this manner may yield a limp, spongy, bound bunch. In that case, add a standard binder, to stiffen and further compress it.
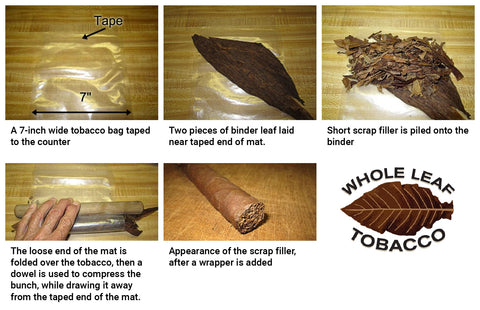
A temporary “Lieberman” can be created by taping a plastic mat (even a WLT 7 to 10″ wide leaf bag) to the countertop, laying a binder leaf on it lengthwise, and then piling short filler in a row across the far end of the mat, and on top of the wide start of the binder. Fold the mat over the pile of filler, then compress and drag the hump in the mat toward you, so that the binder strip is wound about the filler as the filler is compressed.
With a little practice, this works reasonably well, though it sometimes required a second binder to be manually wrapped onto it, before the wrapper is applied in the usual fashion..
1) Single binder
For a bunch that you plan to place into a mold, a single binder is usually sufficient. Lay the binder half-leaf so that the leaf tip is closest to you on the rolling board, the under surface of the leaf (most prominent veins) is facing up, and the veins are horizontal to you. Place the gathered bunch of long filler parallel to the veins, with the “foot” end near the closest tip of the binder. Bring the bottom tip of the binder toward you, and then over the bunch, and tuck it under the opposite edge of the bunch-like wrapping a scarf around a neck. Begin wrapping it by compressing the bunch beneath your fingertips, and very slowly rolling it away from you, while keeping the binder taut and smooth. This takes a little practice. When you reach the “head”, and the bunch is entirely wrapped, you can apply a small amount of cigar glue to hold it wrapped, or simply twist the end of the binder well, and clamp it with a clothespin.
The binder can appear sloppy, so long as it compresses the bunch adequately, and does not leave gaps. Its sins will be hidden by the wrapper.
2) Double binder
When using relatively delicate binder leaf, or when rolling free-hand, without a mold, a double binder reduces the risk of the filler puncturing through to the binder, increases the stiffness of the bound bunch, and allows for better compression of the bunch. A double binder is easier for a new roller to learn to use effectively, since it requires less of an understanding of how much stress a particular variety of binder can handle.
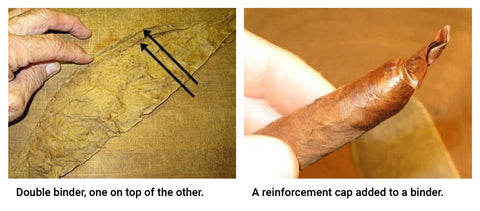
A single binder is laid flat on the rolling board. A second binder half-leaf is laid on top of it, with its veins oriented the same, and with its outer edge slightly “inside” the outer edge of the first binder. If you create a double binder with the two halves of a single, stemmed leaf, one will have its veiny side up, and the other its veiny side down.
Wrap the bunch within the double binder as though it were only a single leaf strip. If you use glue, glue the final edge of both binder layers.
3) Reinforcement cap
If the “head” (the mouth end) of the bound bunch does not feel as sturdy as you would prefer, you can often use the remainder of the unused binder strip to reinforce the head. Trim the lower margin of this scrap perpendicular to the veins, so that you have a vertical straight edge. Mist it lightly with non-chlorinated water, then start wrapping the bound bunch 1-1/2 to 2 inches below the head. This will add an additional layer to the binder at the head, and will be hidden under the final wrapper.
If you begin with a nicely bound bunch and a properly trimmed wrapper strip in high case, this is the easiest aspect of making a cigar. Wrapping an aesthetically flawless cigar requires experience. Wrapping one that you can be proud of does not. The wrapper should be in high case, so that it is fully relaxed, and its secondary veins limp and straight. The leaf strip is laid out in the same manner as for a binder. Begin closest to you, with the “foot” of the bound bunch about an inch from the tip of the wrapper strip. Bring the tip of the wrapper toward you, then carefully wrap it over the foot of the bunch, and tuck it beneath the far edge of the foot. [The foot of the cigar is sometimes called the “tuck”, because in starting the wrapper, you wrap then tuck it under the foot.]
Wrap the bunch by rolling it away from you, while gently applying tension (and smoothing) to the underlying wrapper strip. Keep veins parallel to the bunch. Don’t hesitate to back up and try a section again. Aim for a snug fit to the outer edge of the wrapper, and a wrinkle-free lay. As you near the head, apply a tiny smear of glue to the outer edge of the wrapper. Or you can just complete the wrap, and close the head with a twist.
Adding a simple or complex (for example. a so-called triple) cap requires that you use cigar glue. Add the first cap using remaining wrapper leaf in the same manner as applying a reinforcing cap on the binder (see above), and glue it. For a more complex cap, an oval or teardrop shaped segment of vein-free wrapper leaf is cut from wrapper scrap using a chaveta. It needs to be long enough to wrap more than one complete wrap around the head, and must be glued on. Any protruding bits of the head must be trimmed and tucked toward the center of the cigar head. Cut a third cap (a circular disc), using a cap cutter, apply glue to it, then hold the cigar vertically above it, head down, and stick the head onto the glue-covered disc. Tidy it with your fingertip.
Approaches to Cigar Blending
Volado
Fliers. These are leaves from the very bottom of the stalk. They are often large and thin, have little flavor or aroma, and burn very well. Volado usually contains very low nicotine concentrations. They seldom appear in the whole leaf market. Their purpose is simply to enhance the burn of a filler blend that otherwise might not burn adequately.
Seco
These leaves are from the lower stalk positions, just above volado, and up to about half-way up the stalk. They are thicker than volado, often quite large, their flavor and aroma are distinctive of the variety, though they are mild, with moderate nicotine. They usually burn well. They comprise the bulk of the filler in milder cigars.
Viso
Viso is leaf from about the half-way point of the stalk, for another quarter of the length up the stalk. Viso leaves tend to be somewhat smaller than seco, are darker, somewhat thicker, and usually have higher nicotine. They don’t burn as easily as seco. Their flavor and aroma are more intense. They are commonly added to a filler blend to enhance the aroma.
Ligero
Ligero leaf is most of the upper quarter of the stalk. They are dark, thick, tend to be small, their flavor and aroma are intense, their burn relatively poor, and their nicotine quite high. They are conceptually used to provide fortaleza, or strength, though many current, premium cigars utilize ligero heavily.
Corona
Corona leaves (sometimes called tip leaf) are the topmost four or so leaves on the stalk, below the start of the blossom head. They often ferment to nearly black (oscuro). They are quite thick, very small, and have an exquisite aroma. Their nicotine is very high. They do not burn well. Corona leaf seldom appears on the whole leaf market. Their use is for very dark wrappers on specialty, small cigars (Petite Corona and smaller), and as a minor blending component. [Commercially, tobacco plants are often topped-the stalk cut off-below the level at which corona leaf grows. This increases the strength, thickness and size of all the remaining leaf.]
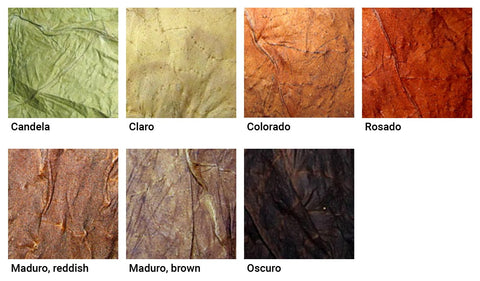
Names for the colors of cigar wrappers is messy, sometimes in Spanish, sometimes in plain English, and sometimes as a designation of the global region of its popularity. With the exception of Candela wrapper, which is artificially flash-cured to retain its green color, cigar leaf color is the result of a combination of tobacco variety and stalk position. Fermentation-the very same fermentation temperatures and duration-produces lighter leaf from lower on the stalk, and darker leaf from higher up the stalk. There is no need for extra efforts to achieve a specific color. It is intrinsic to the leaf. If all the leaf from an entire plant is fermented together, the lower leaf comes out lighter, the higher leaf darker. It just happens.
With only about a half-dozen wrapper color designations (aimed at cigar consumers), they are always inadequate in describing the continuum of color shades seen in wrappers. Intermediate tones are sometimes designated as, for example, claro-colorado. Although one can certainly identify not only wrapper leaf by its color, but also binder and filler, the color designations tend to be reserved for wrapper, while the stalk-position names (volado, seco,viso, ligero) are usually applied only to filler grade leaf.
Candela (or Double-Claro)
The name (candela) refers to their method of flash-curing, using heat. These bright or dull green, thin wrappers, are usually too delicate for use as binder, and are not used in filler. The leaf retains its chlorophyll, so tastes “green” or “grassy”. Sometimes labeled as AMS (for American Market Selection)
Claro
Claro is a light tan color. It presents a mild taste to a cigar, and can be used to somewhat tame a more intense filler blend. Most claro leaf comes from the lower stalk. This is sometimes labeled “Natural”, as is EMS.
Colorado
This is a vague color that encompasses darker claro as well as lighter maduro. In some instances it is literally reddish brown, rosado. The flavor is richer. It generally comes from mid-stalk leaf. It is sometimes designated as EMS (for English Market Selection).
Maduro
The name means, “mature”. But its color has nothing to do with leaf maturity. It ranges from a rich chocolate brown to a very dark brown. The flavor is usually rich.
Oscuro (or Double-Maduro)
This is wrapper that is nearly black. Its flavor is rich, sometimes slightly sweet. Only certain varieties of tobacco produce leaf that naturally ferments to oscuro. Some oscuro wrapper burns poorly, and thus require a binder beneath that burns well.
Although many cigar smokers enjoy a range of nicotine strength in their cigars, it is possible to blend cigars to have relatively low nicotine, or by contrast, to have toxic levels that cause you to fell ill. New tobacco users will have a baseline nicotine tolerance lower than that of experienced users.
Nicotine is absorbed from cigar smoke into the body almost instantly through the mouth and nasopharynx. Nicotine circulating in the body has a half-life of 1 to 2 hours, that is to say, without additional nicotine absorption, the current level of circulating nicotine will be reduced by half, over a span of 1 to 2 hours.
The earliest indication that you may have taken in more nicotine than you can handle is the sudden onset of hiccoughs or belching. As nicotine absorption continues, an increasing nausea or malaise develops.
In evaluating your own preference for nicotine strength in the cigars that you blend, keep in mind that total cigar consumption per time is a factor. If you smoke two cigars sequentially, within a few hours time, the nicotine of the second cigar is added on top of most the nicotine from the first. Thinner cigars release their nicotine more gradually than fatter cigars. Leaf from higher on the plant contains more nicotine that lower leaf. And of course, heavier weight cigars contain more nicotine that lighter weight cigars of the same blend.
Nicotine is cleared from the body more slowly in individuals 65 years and older. Meals and physical activity usually speed the clearance of nicotine by the liver, while consumption of grapefruit juice slows nicotine clearance by the liver.
All of this detail is to highlight that personal nicotine preference can vary in the same individual under differing circumstances, at different times of the day, and at different ages.
[Benowitz NL, Hukkanen J, Jacob P:Nicotine Chemistry, Metabolism, Kinetics and Biomarkers.Handb Exp Pharmacol. 2009; (192): 29-60.]
In trying your own blends of different nicotine strength cigars, your impression from a single cigar at a single moment in time may be misleading. Roll several of each blend, and try those spread over a span of a week.
Cigar filler that is predominantly seco filler is representative of the low end of nicotine strength. A very full nicotine strength can be achieved with half the filler as ligero, a quarter viso and a quarter seco. An all ligero cigar (which might have a wonderful aroma) will knock most experienced cigar smokers onto their backsides.
There is no exact science to your preferred range, and only modest rolling experience will give you a feel for your own sweet spot.
There is more to cigar leaf than nicotine. Each variety has its own unique characteristics. Each grower may ship the same variety, but with subtle differences in character. Each growing region and each growing season add their own nuances to a batch of leaf.
To get a sense of the character of a new batch of leaf, roll a very small cigar (like a petite corona) with filler comprised entirely of that leaf. Use familiar wrapper and binder, or find usable wrapper and binder among the batch of filler leaf, and make a puro of that variety. With even the very finest leaf, this may not be the best way to enjoy it in a cigar, but the purpose is rather to identify what is unique about this particular leaf. Perhaps take notes.
Keep in mind that the apparent strength of a cigar using the very same filler blend increases as the diameter of the cigar increases. A blend that seems too mild in a smaller cigar may be perfect in a fatter cigar. Your impression will also be influenced by other factors beyond the cigar being smoked. Is it the first cigar of the day? Have you eaten? Are you drinking something while smoking it? Are there cooking aromas in the background?
Start with a general combination of seco/viso/ligero ratios that is familiar to you. It will certainly be different with different varieties and batches of leaf, but that minimizes one confounding variable in comparing a new, trial blend to a blend with which you are already familiar.
In making adjustments to a new blend, do so in small increments. And take notes.
Roll the same trial filler blend in different wrapper/binder combinations, and in differing ring gauge cigars. Smoke them thoughtfully, so that you force yourself to analyze the characteristics of each trial cigar.
Even with a great memory, you will find that brief, contemporary notes, taken while thoughtfully smoking a test cigar, can prove helpful in settling on an ideal blend for your tastes. Keeping a tiny writing tablet handy will encourage you to jot down your thoughts as you smoke. Keep it simple, so that the process of documentation doesn’t become annoying. There is no advantage to writing elaborate prose, or consulting an “aroma wheel”. The notes are for you alone to read. Retain your notes.
There is a lot of myth surrounding “resting” a newly rolled cigar, prior to smoking it. Most of the resting time suggested by many is indeed required, in order to allow overly moist tobacco, rolled in an overly moist state, to dry-down to an appropriately smokable condition. Melding of aromas, etc. is probably not meaningful for a cigar. If the filler is initially rolled while in low case, it will not substantially change over hours or days or weeks (or longer) of resting.
Depending on ambient humidity, the binder and wrapper do need to dry to low case, in order to smoke at their best. This may be a mere 15 minutes or several hours or even longer. But once they are at the same low case as the filler, the cigar is ready to fire up.
If you want to taste cedar, then you will need to rest a cigar inside a cedar chest for a while. But this is more of a flavorant issue, rather than a natural “settling” aspect of tobacco that has been rolled into a cigar.
Cigar Rolling Problems
The leaf is too dry-it is out of case. Mist it very lightly with non-chlorinated water, place it into a container and wait a bit.
Usually, a few small, random holes in the binder leaf won’t matter. If there is a hole that concerns you, lay a small, vein-free segment of leaf (a patch, if you will) onto the hole prior to rolling the bunch, so that it will end up on the interior of the binder.
There are two reasons why a binder may tend to tear as you wrap a cigar. Each binder variety, and sometimes each leaf within a batch, depends on its stretch and tensile strength to remain intact as you roll. If you exceed that, usually from expecting it to perform too much compression of the bunch, then any binder will tear. For a novice roller, the most common cause of binder tears is that case of the binder leaf is too low. Mist the binder more, or allow it to hydrate inside a bag for longer, prior to rolling.
If you wish to roll a cigar that is longer than your available binder leaves will permit, then use an additional binder leaf. On the cutting board, lay out the leaf strip that will bind the head end of the cigar, then lay a second binder leaf strip on top of it, but moved toward the foot end. They must overlap for at least one circuit around the bunch, in order to stay wrapped. The “head” segment will trap the “foot” segment.
This is all about your fingers and palms learning to feel a consistent volume in a compressed bunch. With practice, you will sense a softer spot, the simply add a bit of additional filler to the soft spot. It just takes some practice.
Although the head may be simply lacking sufficient filler (see “uneven” above), the head may need to be tapered and compressed more tightly. Consider adding a reinforcement cap to the bound bunch.
Your bound bunch is too fat for the mold. If it requires considerable effort to seat a bound bunch into a mold well, the bunch should probably be taken apart and re-bound to a slightly smaller diameter.
The glue-water mixture is too wet-too runny. Glue of a proper consistency will prevent sliding of the two contact surfaces as soon as they are pressed together. Allow your glue batch to dry a bit, and try again.
As with the binder, experience using a particular wrapper will provide a sense of how much stretch and tension the leaf can provide, before splitting. Also, a wrapper that is not in high case will tend to split as you approach the head of a tapered cigar.
Sometimes your chosen wrapper leaf may be too small for the cigar. If you attempt to make do with it, the wrapper is likely to burst near the head (in that last desperate inch of your desire to make it fit).
If the cigar is just for yourself, it does not need to resemble any other cigar on the planet. Remove the damaged wrapper, trim it to a reasonable shape, then leave as much of the binder exposed as necessary for the remaining wrapper to easily succeed. You will end up with a wrapper cap, large or small.
Many wrappers can be laid perfectly flat at their outer edge, even without trimming. Some are too wavy at the margin to allow that. The quickest solution (why it is used in cigar factories) is to trim away that outer margin with a chaveta, leaving a flat, flawless edge. Otherwise, care and practice will allow you to maintain a flat, uncurled outer margin without trimming.
This is due to applying inadequate stretch at the outer margin while wrapping. The wrapper may need additional moisture. It is also possible that the edge needs to have some of its curve trimmed away with a chaveta.
Wrapper usually needs to overlap only about 3/8 inch. If the wrapper strip is too broad, the inner edge will be unable to lay flat as the cigar curves away. Try a narrower trim to the wrapper strip.
If the cigar appears and feels well rolled, but the draw is too tight or too lose, the adjustment is usually about compression of the filler by the binder. If the filler is in too high a case, it is easy to over-compress it, without applying much pressure while rolling. Stuffing a perfectly compressed bunch into a cigar mold designed for a narrower diameter cigar will lead to a beautiful cigar that will not draw. A “knot” or folded-up chunk of tobacco within otherwise aligned filler can serve as a choke point.
Filler in low case is difficult to over-compress in cigars that are the diameter of a corona or greater (about 5/8 inch). With very thin gauge cigars, the very same compression can obstruct flow. You will just have to practice more to acquire a sense of how tightly to compress a lancero.
If the draw is too loose, simply increase the compression applied by the binder.
Bunching using a book or accordion method has a tendency to create air flow channels at the folded corners. If a portion of a “stack” of folded leaf is curved to fit within the bounds of a cigar’s sides, the area of filler opposite that curved stack will serve as a low-resistance flow channel for air and combustion, causing channeling down the side, or “canoeing”. One remedy is to fold narrower “books” or pleats. Another is to use a different bunching method.
Smoking a cigar in windy conditions tends to cause the cigar to burn down one side.
All finished cigar leaves will burn, some better than others. Leaf from lower on the stalk (e.g. seco) usually burns better than leaf from the upper stalk (e.g. viso and ligero). In addition to the intrinsic combustibility of the leaf, some leaf is more hygroscopic (water attracting and holding) than other leaf. With these latter tobaccos, smoking them in very high ambient humidity (where the relative humidity is chronically elevated well above 75%) leads to a cigar that may light easily, but then go out with increasing frequency, and perhaps become “fire-proof” after smoking only about half of it.
There are only two possible solutions. Save these cigars for very dry conditions, or alter the blend.
[For home-grown leaf, using fertilizer that contains too much chloride may lead to very poor leaf combustion.]
Add more viso or ligero, and less seco to the blend. (Ligero is stronger than viso.)
Add more seco, and less viso and ligero to the blend. (Ligero is stronger than viso.)
Some wrappers tend to continually shed fine flakes of ash. Tobacco ash is entirely residual minerals, with all the lignin of the leaf fiber consumed in the combustion. What is amazing is that any cigars hold a long ash. Of course different leaf ingredients in the filler, binder and wrapper have differing structure to their left over minerals. Cigar ash without a binder or wrapper usually collapses soon after it is formed. So most of the ash retention is due to the layered nature of the wrapper and binder in contrast to the lay of the filler-similar to plywood. A possible approach to improving ash hold is to increase the overlap of the wrapper, or to just use a double binder.
Smoking a cigar increases the moisture content of the filler. Letting the lit cigar go out permits that moisture to be more fully absorbed into the cooling filler leaf, whereas continued smoking keeps the filler warmer, driving the moisture out through the head. If ambient humidity is higher than your humidor’s humidity where the cigar sat, it may have absorbed even more moisture.
Some tobacco varieties (and some batches of the same variety) are more hygroscopic than others, and tend to more easily latch on to ambient humidity. Storing in 60 to 65% RH may remedy the problem, except when ambient humidity is quite high.
There may be a lot of factors at play.
“These blends are made up of filler, binder, and wrapper parts and include cigar glue so you have everything you need to create your cigars in one package. Each blend contains about 1 lb. Of tobacco which is enough to make approximately twenty 50 x 7 cigars. Cigar kits are a great way to economically sample multiple tobaccos.”
Unless you are already accustomed to smoking potent cigars, start with one of the milder blend kits, such as the Melodioso Cremosa kit. You can always purchase separate viso or ligero leaf of any variety to bolster the strength, if your initial blends seem too mild. Or you can go with the Sabroso Medio, which is a bit stronger blend.
If you are certain that you want to start with a stout blend, then select any of the other blend kits.
Leaf Selection
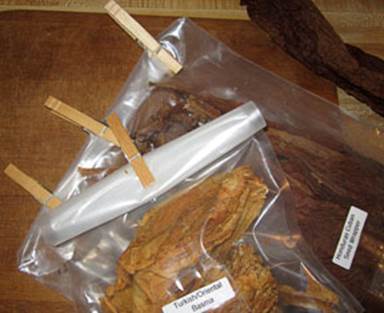
Acquire a heavy plastic bag that is at least 24 inches wide. A gallon or 2-gallon Ziploc bag can do. At least an hour or two in advance of rolling, heavily mist one or several wrappers and binders with non-chlorinated water. The stems will absorb some of the moisture with adequate time, leaving the lamina (the part of the leaf that you will use) in medium to high case.
Filler leaf can be stored in low case, and always ready for cigar rolling. If it is too dry, then the day prior to rolling, lightly mist non-chlorinated water into the leaf’s storage bag, and re-close and clamp it. The added moisture will generally distribute among the leaves in the bag after 24 to 48 hours. Doing this on several different bags of filler that is too dry will give you a sense of how much to mist any particular bag of filler. You want it to be still somewhat noisy, but pliable enough not to crumble when handled or when the stem is removed.
For both wrapper and binder, the central vein, or leaf stem, must be removed prior to their use in binding or wrapping a cigar. The leaf should be in case. It will crack and tear if too dry. The simplest and most reliable method of stemming that will not risk significant tearing of the wrapper or binder is to turn the leaf so that the tip is toward you, and the underside of the leaf (generally a lighter color than the upper surface, and always with more prominent or visible veins) facing upward. Fold the leaf in half along the stem. About one to two inches from the leaf tip, firmly grasp the folded leaf alongside that portion of the stem, and with the other hand, carefully tear away the stem, extending the tear toward the leaf tip. Once this is free, move the grasping fingers away from you, still alongside the stem, to the next pair of secondary veins, and with the other hand, grasp the now thicker stem, and carefully tear it from the lamina and secondary veins that you are holding. Slowly work your way toward the butt of the stem, grasping at each pair of secondary veins, to prevent them from ripping into the lamina.
You will see in videos every manner of “expert” stemming techniques that may include wrapping the leaf rapidly about the hand, as the stem magically comes away. With practice, this can work with some varieties of leaf in a certain conditions of case, but be warned that you may or may not be happy with the outcome. And you will save only about 10 seconds per leaf-if it works.
The unused halves of wrapper and binder should be promptly returned to their bag or container, so that they don’t dry out.
For filler, not as much care is required, since a broad tear into the lamina is not a fatal flaw. For filler with full-length stems, the stemming technique is the same as for wrapper or binder, with the exception that it is usually more convenient in handling the filler leaves if you retain a segment of stem at the tip-usually slightly shorter than the proposed cigar-to keep the two halves joined, and to add a bit of rigidity to the final cigar. (Stem is lower in nicotine than the leaf lamina, but burns equally well.)
Some whole leaf filler is shipped partially stemmed, in a state known as “frog-legged.” The frog-legging is performed on the premises of the tobacco producer or fermenter. In the process, the thickest half or more of the stem is removed, leaving the thinnest portion of the stem joining the two leaf halves. (Leaf from some factories are frog-legged in a tidy fashion, but other factories may ship fairly sloppy frog-legged filler.)
If the remaining stem of a frog-legged filler leaf is longer than the intended cigar, it is usually easier on the cutting blade (tuck cutter or cigar clipper) if it does not extend all the way into the head of the cigar. A shortened stem also eliminates the possibility of a stem protruding from a cigar head when it is opened for smoking. To shorten the stem of a frog-legged leaf, again fold the leaf so that the under surface is out, tear a small area of lamina where you want to snap the stem (this makes snapping it easier if the stem is tough), snap it, then work your way toward the thicker portion of stem. This is usually a very quick process.
For stiff stems in frog-legged leaf, select a length of stem to preserve that does not curve toward the side. You want the stem remnant to be easily embedded within the bunched leaf, and not sticking a sharp end sideways, toward the binder, where it can easily puncture a hole.
Filler
Depending on the nature and initial length of your filler leaf, it will likely need to be shortened in some manner. The simplest approach, if you are planning to quickly hand-bunch the filler randomly, is to align the tips in one hand (say, with them pointing upward), then tear the bottom to your desired length. The remaining leaf is then aligned with the tips, compressed, then torn again to the same length. Repeat for the length of the remaining leaves. This bunch is then well compressed with both hands, prior to rolling in the binder.
With more the more complex, accordion method or tube method, the filler length is cut to an appropriate length using a chaveta. Some even use a ruler or template to measure the length to cut.
Binder
Most binders, after removing the stem, require no trimming. If the thick ends of the remaining secondary veins appear to pose a threat of puncturing the binder as it is wrapped, then use a chaveta to cut a thin arc along that inner edge of the binder leaf, removing all the thick vein ends in the process.
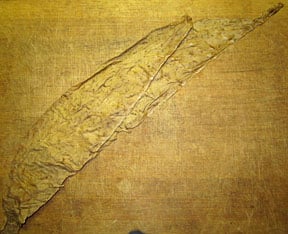
Wrapper
If, when the wrapper half-leaf is laid out flat, a crinkled or curly outer edge remains, then trim that away with a chaveta, so that the wrapper will lay well as it is wrapped. That issue aside, an untrimmed wrapper is somewhat more difficult to lay well on the cigar, because of the excess lamina on the back edge. The wrapper strip needs to be wide enough so that, given the ring gauge of the planned cigar, there will be at least a quarter to a half-inch overlap as the bunch is wrapped.
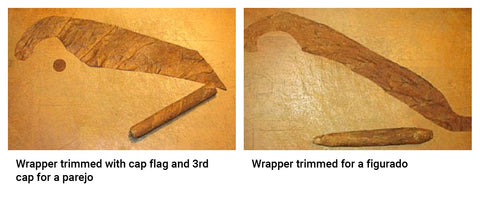
For a cylindrical cigar (so called parejo or parallel), no arc is required in the wrapper. So it can be trimmed as a straight strip of leaf. (With a large wrapper leaf, the leftover leaf may be adequate to wrap another cigar, though the secondary veins will be a bit thicker in the cutaway strip.) For making a triple cap, a flag can be left attached to the wrapper strip, or can be cut separately. With a triple cap, the “third” cap is the circular disk that tops the head.
For a shaped cigar (e.g. torpedo), different portions of the wrapper may require a differing arc to be trimmed. If you are using a figurado mold to produce identical figurado cigars, you may want to make a paper template of the ‘S’ shaped wrapper, once you find just the right size and arcs.
How Length, Ring Gauge and Pressing Impact the Smoking Experience
It’s actually rocket science. A cigar-its length, diameter and cross-section (rectangular or round) and degree of filler compression (obstruction to flow) all influence the flow of air, and with it, the flow of the heat of combustion as the cigar burns. This flow of air and heat determine the combustion temperature of the “cherry”, which affects the mix of combustion products (what you smell and taste).At combustion temperatures that are neither too high or too low, the taste and aroma of a cigar are usually considered to be at their most enjoyable. A smoking cigar is a dynamic system. Combustion produces water in the chemical oxidation process. This water is then drawn toward the head of the cigar, where it is partly absorbed by the filler, causing its rate of combustion to slow, and swelling the filler so as to reduce air flow.
Narrower cigars tend to burn at a higher temperature than fatter cigars. So the same blend will seem different when rolled into cigars of different ring gauge.
Square or box-pressed cigars have functional “corners” that channel cooler air around the center of the “cherry”. Thus the total air flow drawn through the cigar has a less direct effect on combustion temperature of the “cherry”. With this alteration in air flowing into the “cherry”, a square-pressed cigar will taste different from the very same cigar left in its natural, round cross-section. Sometimes, harsher filler blends seem smoother when the cigar has been square pressed.
All cigars filter their smoke through the length of remaining filler-moderating any flavors within the smoke. The longer the cigar, the greater the initial filtering effect. The thinner the cigar, the more these trapped chemicals are concentrated-sometimes to the point that a nearly black, oily and bitter bead of condensate may appear at the cut head.
But with cigars of any size and shape, the flavor and aroma becomes stronger (perhaps harsher) as you smoke toward the head (the cigar butt-yes, the head is the butt). With longer and thinner cigars, you may reach this point with 2 or more inches of cigar remaining. With very fat cigars, you may burn your fingertips before tasting it. How much of an issue this becomes is highly dependent on the filler blend.
A fatter cigar supports a larger cross-section of actively combusting tobacco, which results in more smoke, or denser smoke, per puff.
Although a fatter cigar provides a somewhat lower combustion temperature, a greater volume of smoke per puff, and the opportunity to smoke the cigar to a shorter butt length, when compared to a thinner cigar, the weight of the unsmokable butt (a weight of tobacco that you have paid for, and committed to this particular cigar) is greater than with a thinner cigar.
Cigar Storage
Cigars stored above a relative humidity (RH) of 75% or greater will mold. Cigars rolled with overly damp filler may mold, even if the storage RH is below 75%. Below about 60% RH, cigars tend to become too dry, and the foot may split.
Cigars should be stored in a relatively stable temperature, or at least an ambient temperature that does not swing rapidly. The manner in which rapidly changing temperature affects stored cigars is by its affect on RH. An increase in ambient temperature of 20°F will drop the RH by half. Stored cigars within any container are not uniformly heated or cooled. One part of the container heats more rapidly than other parts. This creates warm spots and cool spots, creating a heat pump that will drive moisture from the warmer area, and condense it in the cooler areas. Cigars in the cooler area then become subject to mold.
Cigars can be stored within bags or boxes of various materials. And these may or may not be themselves contained within a humidor or larger box or tub. Wood containers provide better temperature insulation, as well as better stability of the internal humidity. Bags and plastic boxes or tubs do not have those advantages. If a plastic container can be made vapor-proof, with a tight fitting, gasketted lid, or a bag zip-closed or rolled and clamped at the open end, then humidity can be maintained for much longer. Thin polyethylene bags, like sandwich bags, are not vapor-proof. Thicker polyethylene bags, such as freezer bags, are more vapor resistant. Laminated poly-nylon bags are completely vapor proof-the material used for vacuum-sealed foods.
The greater the total mass of cigars (or whole leaf) stored within a container, the more slowly it changes in both humidity and temperature. So a full humidor is more stable than a nearly empty one.
Whole Leaf Storage
Whole leaf tobacco should be stored at a relative humidity (RH) of 75% or lower. By keeping filler in low case (RH ~ 60%) and binder or filler in medium case (RH ~70%), it will be ready for rolling right out of the container (bag, etc.). Medium case wrapper will require some additional humidification prior to use. Leaf that is maintained in high case (RH above 75%) is ready to roll, but may mold if stored in that condition.
As discussed in detail for storage of cigars, storing whole leaf in a relatively stable ambient temperature is important. If the temperature swings rapidly, moisture will condense in portions of the leaf, and may lead to mold.
Cigar leaf (whole leaf) from wholeleaftobacco.com is usually shipped in sealed, vapor-proof bags. Unopened, the leaf can be stored in the bag for at least a few years, provided the ambient temperature is relatively stable.
Once such a bag is opened, it can still serve for excellent storage, so long as care is taken in opening it initially (cut it carefully just below the heat seal using a pair of scissors), and it is promptly re-closed each time that you remove leaf from it. Press out all the excess air. Fold the corners of the open end to a right angle, then tightly roll and flatten the entire open end over itself several times. Follow this with clamping the rolled edge flat, using a chip-bag clamp or two or three clothespins. Simply taping the rolled end will allow it to leak air and vapor.
If you store whole leaf within large, plastic tubs, it will gradually dry. Once completely dry, the tobacco is at zero risk of developing mold. Tobacco will not age further, so long as it is totally dry (out of “case”). Tobacco that is out of case will instantly crumble to fragments and dust, if handled or dropped in that state. Should the tobacco become completely dry, just mist it lightly with non-chlorinated water, close the container, then recheck it in a day.